5 days ago
Friday, May 29, 2009
Herb Plant Markers
Doesn't everyone dream of their own herb garden and the impact it will have on their cooking? I planted just a few herbs that I know I will use in pots that I will put on the deck outside the kitchen door. Before I forget what I planted and where, I wanted to label them. I'm not a big fan of the plastic markers you get at garden centres so I thought I'd make my own. Using the paper candy labels I had left over from the shower I threw for my cousin earlier this month, I wrote in the name of each herb. To protect them from the elements, I put each label inside small ziploc bags. The stakes are flat BBQ skewers which I hot glued to the back of each bag. I think they're practical and cute, the best type of combination.
Underachieving, and loving it
I love gardening but I have to admit that sometimes I put pressure on myself to outdo the previous years' flowers. As I mentioned in a previous post, we are painting our house this summer so I figured why plant flowers that will just be trampled when the house gets painted? So I kept it simple and just planted the 2 large planters on either side of the front door and my 3 hanging baskets. It was freeing to just go and pick a few flowers without feeling the need to pick something better than last year. I went to a very small nursery and got all the flowers I wanted for a mere $20.00!!!
The amount that I got would easily have been double at another nursery. Later that evening I planted the pots and do you know what? I like my pots better than the ones I did last year! Here's to underachieving and succeeding!
Thursday, May 28, 2009
Fabulous Fabric
I have bought upholstery fabric from Hancocks of Paducah out of Kentucky. They have good prices and a great selection of quilting cotton and upholstery fabric. I received an email today announcing their new fabrics and checked them out. Isn't this print fabulous? I'm trying to find somewhere that I can use it.
Tuesday, May 26, 2009
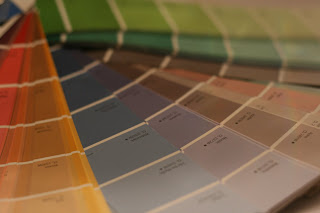
Picking Paint
We are painting our house! We have been in it for about a year and a half and it's time for a facelift. It's a 20 year old home and just in need of some freshening. We're also restaining the deck and repainting the front porch, which is sure to result in an excellent before and after. The house is currently white but, being in the country, we have lots of dirt and dust blowing through and I think I'm going to choose something that won't look grungy quite so quickly.
Choosing a color for an interior room is intimidating enough where a mistake only costs 20 to 50 dollars to fix but choosing an exterior color is a whole other ball game. How will I choose? My indecisiveness is a problem at this point as my paint color selection is now the only thing keeping the painter from starting. Thankfully, I've been noticing exterior colors in anticipation of painting and I'm hoping for a moment of revelation. I think I might check out a few of the paint company websites to see if they have a virtual program so I can see before i commit. That reminds me, I also need to pick a color for the front door and the garage doors...oh my. Any suggestions?
Saturday, May 23, 2009
April (and May) Showers bring June Flowers?
I'm not sure what the weather has been like where you live, but I'm beginning to feel like spring needs to hurry up and arrive. I have plans (landscaping, gardening, bonfires, outdoor painting projects, water sports) and the need for warm weather considering that we only have until the end of September (at the maximum) until Fall arrives. I needed a pick-me-up so I stopped by the grocery store after work for some flowers. To my delight, there were tubs of discounted flowers (who doesn't love a good deal?) so I picked out 3 bunches of yellow flowers. Yes, they are the lowly carnation, but I was inspired by flower arrangements on www.absolutelybeautifulthings.blogspot.com using carnations. I found a tin can that was left over from a previous craft project, cut the flowers down, and placed them on my bedside table. It makes me so happy as I sit down to type this and share it with you.
I'm curious, what are your spring/summer plans and projects for this year?
Friday, May 22, 2009
Surprise on my Porch
There was a surprise waiting for me on my porch tonight at the end of my 12 hour day. Raspberry canes and rhubarb plants! I was so excited, as images of yummy pies and jams dance through my head. My wonderful mother, after hearing my desire for my own raspberry bushes and sadness over the death of my rhubarb plant, apparently found me what I was looking for. There is nothing like picking fresh, warm raspberries and eating them while weeding the garden, or taking a bite of the young rhubarb stalks that are the perfect tartness that they don't need any sugar yet. I remember my grandma letting me and my cousin pick her raspberries when we were kids, and that she didn't get mad at us when we stained her aprons after we used them to gather up all the berries. I love gardening for the result, but also all the good memories that I recall and the new memories that it creates. Now to get those plants in the ground...
Wednesday, May 20, 2009
Boiled New York Style Bagels
I was recently reminiscing about the trip that my husband and I took to New York City almost 2 years ago for our third anniversary. It was the first visit for both of us and we were able to take in the Staten Island Ferry and the statue of Liberty, the former World Trade Centre Site and a Broadway show (love, love, love Mary Poppins!) With all the amazing experiences, one of the most memorable was picking up fresh New York Bagels with homemade Cream Cheese. It was amazing standing outside the shop in the morning, watching the steam coming out of buildings and grates, looking at Broadway show signs across the street.
I vowed when I came home that I would never partake in another mediocre bagel again. Well, I did but I couldn't forget the chewiness of the bagels from New York. While perusing blogs I found someone (sorry, I can't remember who) talking about boiled bagels and that this step was what gave bagels their chewiness. They're right! I found the following recipe on allrecipes.com for boiled bagels, tried it and loved it! They are best the day they are made but are totally worth the effort, and would be good for sandwiches the next day.
New York Style Boiled Bagels
4.25 cups all-purpose flour
2 (0.25oz.) packages of dry active yeast (I used quick-rise)
1.5 cups warm water (approx. 45 degrees C)
3 tablespoons white sugar
1 tablespoon salt
1 tablespoon white sugar
Directions:
1. In a large bowl, combine 1.5 cups flour and yeast. Mix water, 3 tbsp sugar, and salt together and add to dry ingredients. (I added the sugar to the warm water and then added the yeast and allowed it to develop. Then I added it to the flour and salt) Beat with a mixer for half a minute at low speed, scraping the sides of the bowl. Beat at a higher speed for 3 minutes. Then mix by hand, adding enough flour to make a moderately stiff dough. (It will be a bit hard to mix)
2. Turn out onto a lightly floured surface and knead until smooth and elastic (8-10 minutes). Cover. let rest for 15 minutes.
3. Cut into 12 portions, form into smooth balls. Poke a small hole in the centre of each ball with your finger, enlarging gently while making a uniform ring shape. Cover, let rise 20-30 minutes (It won't seem like much but they will rise a bit)
4. Meanwhile, start a gallon of water boiling in a large pot. Put 1 tablespoon of sugar in it (I added 2 tbsp of molasses, which worked well) Mix in and reduce to simmering. (Prepare the baking sheet with a silpat or parchment paper and sprinkle with cornmeal.)
5. After letting them rise, add 4 or 5 bagels to the water and cook 7 minutes. (Boil 2-3 minutes per side, and this will cause the bagels to rise further) Drain them and place on the baking sheet. Bake at 375 degrees F for 30-35 minutes.
*Note: for a glossier top, broil the bagels on an ungreased baking sheet for 1-1.5 minutes on one or both sides before boiling. If you broil the bagels before boiling you will only need to bake them for 25 minutes. (I debated whether or not I would take the extra time to do this step. I did, and it was well worth it for the final result of a crispy outside and a soft chewy inside)
The recipe recommends heavily greasing the baking sheet but I used a Silpat and sprinkled cornmeal on top, and that worked very well. My hubby loves sesame seed bagels so I sprinkled sesame seeds on top before baking but they could definitely be converted to your flavor favorite. Enjoy!
Tuesday, May 19, 2009
Family Photo Project
I had a space in our family room that was begging for something to fill it. I have to admit that after a year and a half of living in our house I still haven't put up more than a few pieces of artwork. Part of this is because I want to wait to find the perfect pieces and part is the general cost of art. I knew that to fill a large space I would need to get creative. I have wanted to put together a collection of family photos since I saw a similar display in a friend's house more than 10 years ago.
In order to create a link between pictures from various eras, I had my hubby (once again coming to the rescue of a project of mine) scan in the pictures and convert them to black and white. Using photoshop I cropped them and had them printed up in either 5x7 or 4x6 prints. I then began to scour the local second hand shops, dollar stores, and big-box clearance sections to find all of the frames I would need, while sticking to a budget. I am proud to say that I didn't spend more than $5 on a single frame. All it took was a few cans of gloss black spray paint to turn my dog's breakfast of frames into a cute bunch of frames that now looked like they belonged together. I picked up a few white mats and voila! Hanging them proved to be the worst part of the job. Although laying them out ahead of time helped, I think I measured twice and still put double the number of nail holes into the wall than what was required. A few choice words and a couple of deep breaths later, I am quite pleased with my thrifty art project. It's proved to be a conversation starter, discussing who looks like who. The best moment though was showing it to my Grandma, who at 82, absolutely loved it.
(the first photo is my husband at around 3 years old, and the second is of my Dad's parents)
Monday, May 18, 2009
Keep Calm and Carry On
For any of you who have read at least one design blog, I'm sure you have seen, and possibly salivated over the Keep calm and Carry On Poster. Designed in 1939 by the British Government's Ministry of Information, this poster along with 2 others (future post on those 2) were meant to be an encouragement to the British people to hold fast as London was being bombed. Using the crown of King George VI, this simple slogan was pasted on walls, although the actual poster was never issued. In 2000, a used book store owner and his wife happened upon the poster while thumbing through a box of used books he had found at an auction. In the current economic environment, it seems that this motto resonates with many people 70 years later.
While the stiff upper lip quality of the British may be what we are wishing we had right now, the poster is also a modern design statement. Originally in red, a variety of colors are now available for purchase online, as the copyright on the image has long since expired. This is one moment where I delight in the fact that my husband owns a screen printing company. He has once again humored me in my many projects and ideas and helped me reproduce the poster in brilliant orange, apple green, emerald green, royal blue, and golden yellow. In his practical way he has insisted that it wasn't worth it to set up to print only one copy and I have a number of them in each of the five colors. ( I'm not a saleswoman but I do have them for sale, just email me for prices and shipping. The image is 17 x 23" with a 1 inch white border.)
Original art, including screen print is one desire of many design aficionados, so it is not surprising that a poster that is also serving up the inspiration that everyone could use right now has become so popular.
Tuesday, May 12, 2009
'What Not to Wear' Bridal Shower
My cousin L is getting married in about 5 weeks and we wanted to have a family shower for her. Being that it was a family shower, we had an age range of 18 to 81, literally. The theme was "What Not to Wear to L's Wedding". I have to say I was impressed by the creativity of the outfits. It ranged from a bridal gown (huge faux-pas) to painting clothes, underwear worn on the outside, crazy vintage apparel to pj's, beachwear, and homemade matching outfits.
Everyone participated and seemed to have a great time. Since L's wedding is going to be blue with orange accents, I used this as inspiration for the candy bar. She is a huge fan of sugary snacks, so I tracked down a variety in her chosen colors and put them in vases to serve as a cute centerpiece and a favor as everyone got to take some home. My wonderful hubby even helped me make cute labels to identify the candy. We had some of her favorite foods and 2 types of yummy cupcakes, almond and key lime. Can I just say that the almond cupcakes are my new favorite. They are incredibly moist and such a grown-up flavor. Congrats to L & C and all the best for your big day!!
Friday, May 8, 2009
First (not-so-fancy) Post
Welcome to my blog. I hope to use it to share my aspirations, inspirations and the quirks of my everyday life, and I invite you to join in the process. Let's start with the name. Random yes but it embodies what I love and hope to share here. Did you ever as a child have a tea party with water or juice? It became more fun because it was in a pretty cup. I remember my mom letting us put drinks in her seldom-used wine glasses and that, my friends, became fancy soda pop. Fancy soda pop refers to the idea that anything, regardless of how plain or average it is can be made to be interesting, enjoyed, and beautiful.
Subscribe to:
Posts (Atom)