1 day ago
Tuesday, September 22, 2009
Kudos to...Grandma
This weeks kudos goes to my Grandma. She is a fantastic pie baker. Tonight my hubby and I enjoyed a night snack (aka late dessert) of fresh apple pie, courtesy of my Grandma. This summer we were discussing rhubarb and I mentioned that I love rhubarb desserts. she offered to make me some rhubarb pie and asked what kind of pie my husband liked. When I told her apple, she offered to make apple pie too. A few weeks later we were the grateful recipients of a rhubarb, an apple and a saskatoon pie. At almost every family gathering, she makes sure that each of her nine grandkids leaves with a pie from her freezer. We all have grown up on, and love her pie. One of my favorite backing memories was when I went over to her house and she showed me how to make pie crust. She always uses lard for her crust, and her pastry is so flaky and delicious.
So kudos to you, Grandma. Derek and I thank you
Friday, September 18, 2009
Drink Sleeve Giveaway!
I hope all of you enjoyed the post on how to make a coffee cup sleeve. I was recently talking to a few people about blogging and found out that they were reading, and I didn't even know. In order to get a better idea of who is reading and what you like, I'm offering a giveaway. Here's how it works: Post a comment between today and midnight on Monday night. Either comment on your latest project that you have completed or one you are wanting to finish OR your favorite type of post (eg. recipes, how to, kudos, etc). I will randomly choose a winner from among the posts, and post the winner Tuesday morning. The winner gets 2 reuseable drink sleeves so you can have one for you and one for your honey (or one for your car and one for home).
** If you don't have an account it's really easy to sign up for one, and then you can post on other blogs too!
Thursday, September 17, 2009
How to Make a Reusable Drink Sleeve
I regularly stop for gourmet coffee in the mornings and am embarrassed by the amount of garbage that is created by this habit. While I have reusable mugs, sometimes I forget them or they are not clean when I need to leave for work. For extra hot beverages, a sleeve or a double cup are needed, which is also more waste.
I had strips of leftover batting from a quilt that I made and hated to see it go to waste. i decided to use it to make reusable coffee cup sleeves. I was so impressed by how cute they were and how easy (less than half an hour), that i thought I'd post a how to.
You will need:
-2 pieces of fabric (approximately 12 X 6 inches)
-1 piece of cotton quilt batting
-2 small buttons
-1 piece tissue paper or brown paper for pattern
-thread, scissors, pins, pencil
-a paper cup sleeve from your coffeehouse of choice
Open the sleeve flat. Trace around it with a pencil, twice. Add 1/4 inch around the outside of your original traced line on one of the outlines. Cut out 2 patterns from the paper, one the size of the original sleeve (piece A), and one with 1/4 inch seam allowance (piece B).
Cut out 2 fabric pieces using the piece B pattern, and one piece of batting using the pattern for piece A.
Centre the batting on the wrong side of one of the fabric pieces (the one that you want to use as the lining of the sleeve) and stitch it in place 1/4 inch in from the edge of the batting.
Pin the 2 fabric pieces, right sides together. Sew these together on 3 sides (2 long and 1 short side). Trim corners and any excess fabric to reduce bulk, and turn inside out. Press flat and sew the fourth side closed (**this side should be the side that will be hidden once the sleeve is completed)
Using a 1/2 inch seam allowance, stitch down (quilt) the sleeve.
Pin the 2 ends of the sleeve together, overlapping so that the bad short end is hidden. Sew 2 buttons near the end of the sleeve to fasten together (*note: you don't have to make button holes).
Enjoy your cup of coffee in style!
Snack Time!
I found these chips the other night while on a wander through Superstore. In some of the stores they have an aisle with organic and gluten free products. I couldn't resist these Terra Chips. Rather than the traditional potato, these chips utilize less familiar root veggies for their flavor. These are made with sweet potatoes and beets! They definitely taste like the veggies they are made from, probably because the ingredients are (I love this) "Sweet Potatoes, Beets, Canola Oil and/or Safflower Oil and/or Canola Oil". That's it. You know what you're eating! If any of you have tired, and loved, sweet potato fries, you'll love them. The sweet potato ones definitely have the sweetness. They're not quite as crispy as a regular potato chip, but the ridges will work well for dips. The back of the bag suggests bruschetta or spinach dip with them, which I could see as a really fun party food option. So if you're feeling adventurous or looking for something with a bit more color to go with your favorite party dip, I recommend these.
Wednesday, September 16, 2009
Joe Fresh Makeup
Joe Fresh, Loblaw and Superstores line previously loved for its low cost, high style clothing, now can be loved for its new line of makeup. I have purchased a few of the items, non essentials to try it out and really, who can resist this fantastic packaging. I was tempted to buy more just to look at them. I bought 2 eyeshadows, a brow color, coverup and mascara. The pink tube is lip stain. I love this stuff. While I should warn you, your lips will really be as bright as the container but the nice part is that you can stain your lips and they have color, it doesn't rub off on your cup of coffee in the morning and you can still use your low maintenance, but protective chapstick. It's also nice for my hubby that I don't have glossy lips, which he hates. Now, I'm not a makeup expert, so I can't really speak to the quality of the makeup, but even with my sensitive skin and eyes, I haven't had any problems.
Have you tried it? I'd love to hear feedback.
Tuesday, September 15, 2009
Recovering my Stools
I bought these black and white stools at HomeSense a few months ago. I liked them, but mainly bought them because I needed more seating in my living room and they were less expensive than the materials I would need to make them myself. I also purchased some fabric (it's the blue version of the brown fabric I used on my chair) a few months ago. I made slipcovers this past weekend for them, as it was about time to finish this project. They can be removed and cleaned, or changed for different seasons. I really like the way they look and they were easier to make than I had expected. I cut the fabric to the total width and height plus a few extra inches. I centered the fabric on each stool and pinned each corner to fit. I then added a bit of room so that it would fit over the top of the legs as well. I sewed and trimmed each corner. After they were sewn, I put them back on the stools and pinned them, like hemming a dress. I then pressed them. My mom has always told me that in sewing, the difference between handmade and homemade is pressing. I like the way they turned out. Stay tuned for the pillow cases I'm working on finishing.
Monday, September 14, 2009
Kudos to...Good Friends
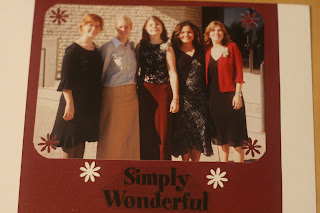
Tonight I had the pleasure of getting together with a group of girls that I went to high school with. We went for supper at Dessert Sinsations, which I highly recommend. The photo above was given to me tonight, which was taken 7 years ago, probably the same time that the 5 of us were all together at the same time. It was so great to sit around for hours and catch up. It feels in some ways that it hasn't been 8 years since graduation, but it obviously was as we were talking about husbands, jobs, and kids. They're such wonderful ladies, and we're planning to get together again soon.
Tuesday, September 8, 2009
Kudos to...My Hubby
This week's kudos (yes, I realize I missed last week) goes to my husband, Derek. He is one of the hardest working guys I know, he is really smart, he is patient, and he always makes me laugh. As I took this picture, I was giggling and telling him he looked funny. He puts up with it. This is part of our nightly ritual...we sit next to each other in bed, each typing and checking out our regular sites as we watch TMZ and laughing at the various craziness on TV. This is our nightly unwinding, and we thoroughly enjoy our mindless time.
Kudos to my honey for being fun, and someone whom I couldn't be without.
Tuesday, September 1, 2009
Ten Minute Bruschetta
I had a supper to plan and 2 additional dinner guests. My husband had offered to BBQ so the meat was taken care of. I had been craving bruschetta but knew I didn't have the time (or desire) to chop all the tomatoes, so I came up with this super fast bruschetta recipe that was also really yummy!
You will need:
1 loaf french crusty bread
1 large can diced tomatoes
1/4 to 1/3 cup fresh parmesan cheese
garlic, minced
basil
onion, or dehydrated onion flakes
olive oil
salt and pepper
Drain well, 1 can diced tomatoes. Place in a tupperware container. Add parmesan cheese. Add other ingredients to taste. I added approximately 2 cloves of garlic, 4 tablespoons dried basil, 2 tablespoons dehydrated onion, and about 1 tsp each of salt and pepper. This gave a very garlicky bruschetta, which I like but many people would find too strong. Close container and shake. Allow to marinate.
Slice the french bread on an angle. Brush with olive oil and place under the broiler for 2 minutes. Place bruschetta mix on bread and place in oven at 400 until heated through. Serve immediately.
Hope you enjoy!
Subscribe to:
Posts (Atom)